Showing posts with label Re-Purposing. Show all posts

Tuesday, April 9, 2013

Crossroads Keys


Crossroads Keys
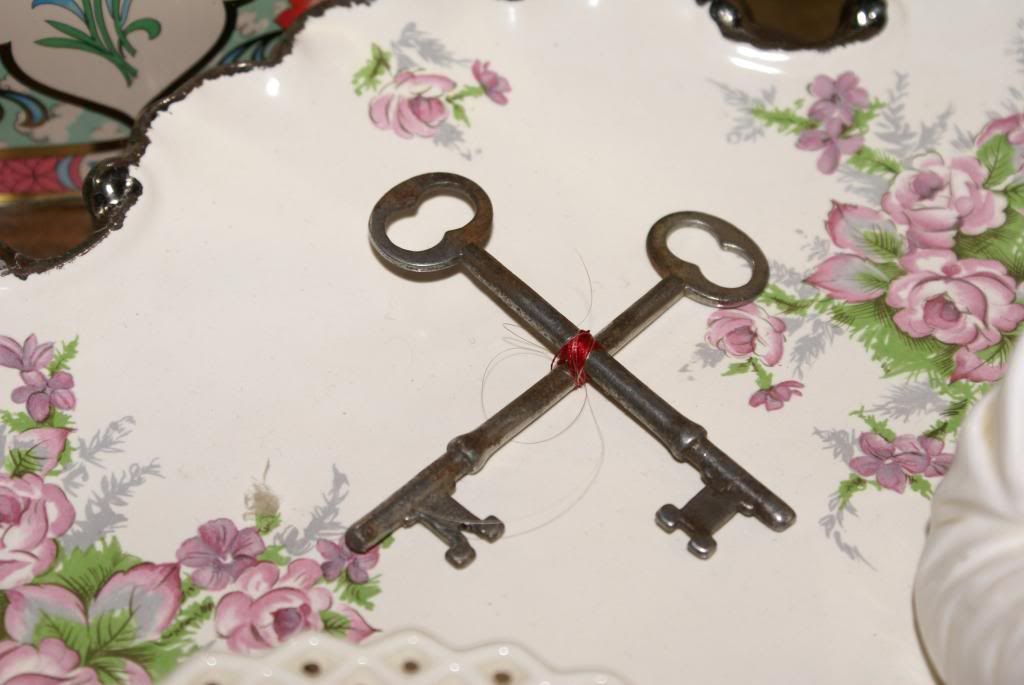
This simple ritual involves taking 2 skeleton keys to the crossroads at midnight or just before dawn. The process is very simple and afterward you have a talisman to keep with you for unlocking what ever it is that you've requested.


My Crossroads Keys were bound with strong red nylon thread, a strand of my hair, my spit, and vaginal fluid.


Need:
2 Skeleton keys that are very similar in appearance
Red ribbon, yarn, or thread that measures from your heart to your left wrist
Personal concerns: hair, spit, anything of yours that can be attached or annointed on the keys
Crossroads
Scissors or knife
Spoon or other digging instrument

Process:
Tie the keys together, and carry them with you for a full lunar cycle. It doesn't have to be Full Moon to Full Moon, but what ever day of the lunar cycle you begin on is the day of the lunar cycle you'll end on approximately 28 days later.

If you can, keep the keys with you, but if not, then at least be sure to handle them daily. Several times a day would be best. To bond this talisman to you, attach a hair, or anoint with your spit, or any other personal concern you feel drawn to bless & consecrate it with.

On the appointed date of your Crossroads Ritual, take your keys, the scissors or knife, and spoon or other digging instrument and go to the chosen crossroads. The preferable time is midnight or just before dawn.

Dig a deep hole in the exact middle of the crossroads and drop one of the keys into the hole. While holding the key in your left hand, bury the other key using your right hand. Once it is completely covered, cut the ribbon, yarn, or thread and bury that thoroughly as well. The hole must be deep enough that traffic will not uncover the key.

Wrap the remainder of the ribbon, yarn, or thread around the remaining key, and keep it. If possible, make it into a necklace to wear especially during rituals. This then, is your "Key to the Crossroads", and opens the door to that crossroads when using it in your hoodoo practice. In essence, you are then at your crossroads while performing your rituals, even if you're physically in your own home.

***
So, find some matching or close-matching keys, and begin making your Crossroads Keys!

Friday, March 30, 2012

A Few Thoughts on Spell Oils

A Few Thoughts on Spell Oils


I used to buy all my oils and herbs. They had great names to them, they smelled sooo good, their labels were fancy, so they just have to be better than anything I could make. There certainly looked great all lined up on the shelf in my altar supply cabinet! Wow, I was really there in the spell supply department!

Wasn't I?

Or was I?

HA! No, actually I wasn't. I had formulas that were put together by unknown people that may or may not have actually used all those (expensive & exotic) Essential Oils and only organic herbs (that supposedly they grew themselves). These fancy labeled bottles were usually a minimum of $5 / dram. Damn! Seriously?! That meant I had to plan my cupboard supply purchases very carefully, as my budget was more than a little limited. Food on the table far outweighed the quantity & variety of spell oils in the cabinet.

There had to be a better way for me. And I was going to figure it out. The first thought was regarding the base oil and the herbs. Ok. They're just plants. Plants grow everywhere. So, which plants would I need for the works I would be doing?

I imagined how my predecessors would've gone about it. The first thing that came to mind was that they would've used only that which they found immediately around them. I'm sure their budget was just as limited as mine and thus only used local not "foreign" herbs and oils. Their cost would've been prohibitive, to say the least. 

Also, the energies of "foreign" plants, oils & herbs bring with them aspects that may not be complimentary to the local environment and those who would utilize those plants. However, I would like to quantify that with, if those same plants and herbs were actually grown locally, then the problem becomes moot. (This is why I want a greenhouse, ooooh, the plants I would grow!)

Anyway, back to the subject; The oils used would've been their cooking oils, so that's certainly easy! Problem solved there.

We have almost 10 acres, which include hillside pastures, woods and a creek running through the woods. (I love this place - and hoping hubby will change his mind about moving). The pastures and woods are full of soooo many great plants used in spellworks and healing situations, and I'm sure there are many which I don't know what they are that are also able to be used. (I really need to find a book that tells me all the plants, i.e. "weeds", as most would think of them, so I can wildcraft them as well).

So, with all the plants we have around the property, and the herbs I grow, and the oil in the kitchen, I knew I was more than equipped to make my own oils. To-date I have designed formulas for, and made:

Blockages Removed Oil (3 varieties: Hard & Fast, Strong & Steady, Slow & Subtle)
Cedar Oil
Dragon's Blood Oil
Fiery Wall of Protection Oil
Juniper Oil
Money Oil
Protection Oil
St. Joseph's Oil

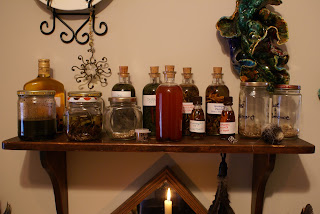
They each work beautifully and I have many more in the works that are soon to be made. The cost for these was barely pennies! The oil was the only thing I had to buy. With the exception of the Dragon's Blood, which I've had alot of for years, the plants & herbs were wildcrafted or harvested right here on our property. The bottles & jars they are in were either bought in bulk at a flea market or re-purposed jars (jelly, salsa, liquor, etc.) from the kitchen.

Are they fancy smelling? No, but they are distinct and representative of their respective herbs and the use for which they were designed and made. For example, store-bought Dragon's Blood smells "pretty & sweet". This is due to an added Essential Oil that is specifically used for making it smell good. Well, surprise, surprise! Dragon's Blood does NOT have a scent unless burned! So why make it smell good in an oil? Simple. So people will buy it, that's why. A true worker doesn't pay attention to such things, they use what they use because it works as the Divine designed it to, and it certainly doesn't need us to try to "improve" it by making it smell a specific way just so we can get someone else to buy it! But for those who must buy their own, there certainly isn't anything wrong with those oils, I know they work quite well. I used to use them myself. But, to be true to myself I had to try this experiment to see where it would lead me.

And my little, personal, experiment proved that I don't need the fancy stuff with the fancy price tags for those tiny dram bottles. I can make what ever I need in what ever quantity I want for 95% less than I could buy it for from all those suppliers!

I no longer buy my oils. I make them. And because they have the energies of my geographical location, as well as my personal energies infused in them from choosing them to using them, I have added powers in my oils that I never had before.

Yes, belief in an object or thing gives it power. But that belief also includes the self! By doing this little experiment I have found a belief in my own capabilities that wasn't really there before. This in turn, increases the power & energy of my works. I've been on this Path for decades and was quite surprised at what I learned.

And I look forward to finding out what else I'm capable of! So stick around if you'd like to follow my journey! :)

Thursday, March 1, 2012

Spell Boxes on a Whim

I was bored, needed something to break the monotony of being retired and no money to go do anything or buy materials for a large project. So I decided on a small project. I went downstairs into the barn and found 3 small hinged boxes that I'd obtained in an "all for $1 box" at a yardsale a few years ago. I was in a creative mood and came up with the following: Curse Coffin, Love & Romance Spell Box, and a Money & Abundance Spell Box. 


Here they are and a brief description of what I did to each:


Curse Coffin: painted black and pieces of a broken mirror glued to the inside; walls, lid, & floor. This is perfect for placing a dollbaby/poppet inside to curse, sending them lots of hexing energies as well as sending back on them that which they put out. A binding or banishing could also be done in this box. If you don't want to have the effects hanging around you could do a couple of things, 1) bury the box and leave it to rot with the dollbaby inside - make a new Curse Coffin each time you need it, or 2) cover it with a cloth (black would be my choice) and open & close it under the cloth so there is no reflection of the negativity allowed to escape onto what ever it is reflecting.


Love & Romance Spell Box: painted fuschia & white, the inside is covered with pieces cut from a rather gaudy tie, and a dried miniature rose & green stone sterling heart were attached to the lid. You can place your petition inside with something belonging to the person of intent, even a dollybaby representing the person or persons involved.


Money & Abundance Spell Box: painted 2-tone green inside & out with foreign coins attached to the top, and broken mirror pieces on the inside to increase the abundance being worked. Place your petition and the largest bill you can get into the box so it will "multiply" for you. A one dollar bill will be fine if that's all you can get, but a $20 or even a $50 would be alot better!


The total cost for this project? Maybe, maybe $1! The boxes were maybe 10c total in the "all for $1 box", the mirror pieces were from an old motorcycle mirror that hubby was going to throw out but I kept "just in case" - well, my "just in case" moment arrived! LOL The paints I've had for years and as the boxes were small, they hardly used any paint at all. The foreign coins I'd been given by my grandparents 40 yrs ago when they used to go traveling around the world. That gaudy tie was from a huge box piled high with ties I'd bought for $5 at a yardsale about 6 years ago (there ended up being over 120 ties in that box!) The rose was my own that I harvested from my rose bushes out front. And the sterling heart charm was in one of 2 large trays of hundreds of charms, beads, chains, etc. that I got for $10 at another yardsale. Love, love, love yardsales! 


So now my spell boxes are done and my boredom is over...on to the next project idea!


***


AzureGreen- Celebrating All Paths to the Divine


Saturday, February 25, 2012

Uses for Those Great Printed Fabrics

Uses for Those Great Printed Fabrics
There are so many types of printed fabrics on the market that are perfect for specific works that I don't see the point in being a purist and only using red flannel. Yes, it's traditional, but there's nothing wrong with evolving and why not have a fabric with money printed all over it for a money bag?! How fun is that?!


So, here are some ideas for some of the great printed fabrics you can find out there:


Money Print:

  1. Money Mojo bags
  2. Abundance Altar cloth for an Abundance ritual work
  3. Cut one (or several) of the bills out of the fabric and burn it to bring an end to debt and money woes or to bring money to you rapidly
  4. Money Drawing, Money House Blessing, and Money Stay With Me spells

Chili Peppers Print:

  1. Hot Foot spells for driving away a negative person or energy, an unwanted neighbor, or a love rival
  2. Fire power to add hot, rapid energy to a work
  3. Combine with the Money print to bring money fast
Dice Print:

  1. Gambling or risk-taking money ventures (especially the flaming dice prints)
  2. Choices-to-Choose-From works
Dragon Print:

  1. Male aspects workings
  2. Working with Dragons
Hearts &/or Roses Print:

  1. Love Come to Me works
  2. Mend a Broken Heart works


These should give you an idea of what to look for and how to use them. There are many, many more designs to be found in fabric stores, so just wander the fabric aisles, get ideas, and grab the ones you want to try out. These fabrics are usually quite inexpensive per yard, so you can  stock up by-the-yard or as little as a 1/4 yd to start out with. Your choice, but have fun with it! Let your imagination run wild!


Of course, if you don't have the funds to pick up these fabrics, you can always make your own! Here's how:


Need:
White/light fabric (cotton preferably)
Crayons or Permanent Markers
Iron (pre-heated, set on Low for synthetics, Medium - High for cottons)
2 Light-weight old towels


Instructions:
Use the Crayons or markers to color your design on the fabric.


Lay out the completed, designed fabric on a table on top of a towel.


Lay the second towel on top of the design fabric.


Place the iron on the towel and let it set a few seconds to heat-set the design into the fabric. Move over, but overlap the last place the iron was set, again let it set a few seconds. Do this all over the design. A design done in marker will take less time. The Crayon design will melt the colored wax into the fabric (as well as stain the towels - so don't use good ones!)


Once the design has been heat-set with the iron you can now put it into the washer & dryer on the hottest settings. This will set the design permanently.


Iron the fabric smooth and you're all set to use!


***


AzureGreen- Celebrating All Paths to the Divine


Friday, February 24, 2012

Proper Bone Preparation

Proper Bone Preparation
One of my favorite items to use in my Craft are bones. I have a boar's skull, mole skull, turtle shells & bones, Badger skull, muskrat skull, and many others. My favorite though are the bones I acquired last year when our 30 yo horse died out in the pasture.


There was no way I was going to let all those wonderful bones from our favorite horse, go to waste! So, I waited until they were picked as clean as possible. I was hoping the buzzards would go to work on them but they didn't, only the bugs. It took about a month but they were finally "ready". One bone I could not get cleared of the skin as it had literally sealed itself on it, and one bone was taken by coyotes. But I did get all the others! They are my prize possession.


Most people would place the bones in water with a bit of bleach. I know, I've done it myself. Well, have you ever noticed how these wonderfully white bones feel chalky? Yep, that's the bleach. And it's eating your bones away, turning it to chalky dust. So absolutely do not use bleach


Here is the way to do it and to preserve the natural beauty of the bones:


Need:
Bones to be cleaned
Large barrel(s) or buckets
Water
Wood ash (1 cup wood ash : 1 gallon water)


Instructions:
Place the bones into the large barrel(s) (I needed 2).


Begin filling the barrels with water enough to cover them completely.


Pour the wood ash into the water as the barrel/bucket is being filled.


Let the bones & ash water stand for several days, check every few days to see how it's progressing.


Small bones will clean up in a few days, larger ones may take more than a week.


Once the bones are clean (note that some skin or other material may still be one them, but easily removed), remove from the ash water.


Wash, scrub, and rinse each individual bone. You may have to scrub some bones more than others depending on how much softened material is still attached.


Once completely cleaned let it dry completely.


Your bones are now clean, natural colored, will not powder and disintegrate, and are ready for what ever you want to use them for.


Here is the Old Man's skull, which sits under the buffet in the living room of our home.


AzureGreen- Celebrating All Paths to the Divine


Saturday, February 18, 2012

Gardening Tips & Tricks

To make a "black" flower look as dark as possible, plant it in full sun with alot of light green foliage.

For pink hydrangeas add lime to the soil (will only work if there is no aluminum in the soil).

For blue hydrangeas add aluminum to the soil.

Turn your long-handled garden tool into a measuring stick for proper spacing of plants! Set a ruler or tape measure next to the tool handle, and using a permanent marker, write the inch & foot marks on the handle.

To have garden twine handy when you need it, just stick a ball of twine in a small clay pot, pull the end of the twine through the drainage hole, and set the pot upside down in the garden. You'll never go looking for twine again.

***
Here's an entire list specifically for ideas on what to do with all those garden catalogs - hint, hint!: don't throw them away! 

***
20 Ways to Recycle Your Plant and Seed Catalogs
Written by: Dottie Baltz

If you are anything like me, you hate waste and I have a hard time throwing anything away, even if I am recycling it with the garbage company. I get a ton of seed catalogs, and it occurred to me that maybe there were more uses for them than we originally thought. Some are so gorgeous with their glossy pages and excellent photographs. So I've compiled a list of 20 creative ideas of things you can do with those seed and plant catalogs once the growing season is over. From the wacky to the practical, there is definitely something for everyone on this list.


Research your garden plant purchases. Many of the better nurseries provide all sorts of plant information in their catalogs. Keep the better ones that specialize on plants that grow well in your region.

Use the catalogs as a learning experience with your kids, grand kids or donate them to a classroom or community group that will be learning about plants and gardening.

Cut out the pictures to help design your own gardens or use them to make a collage.

Use the colorful pages to wrap a gift for a gardening friend.  Use ribbon to camouflage any seams.

Cut out the photos to embellish greeting cards, calendars, gift tags, or to make a story book with your kids.

Make seed envelopes. Complete instructions can be found here.

Cut out the flower images and decoupage on glass, dress up cardboard boxes or coasters.

Make paper chains or those chains we used to make with gum wrappers. I found instructions for those here.

Embellish garden journals with instructions or photos from the catalogs.

Glue the flower pictures on top of an old table top then coat it with several layers of polyurethane to dress up an old craft table or kids table.
           
Cut out the flower images and make magnets or stickers. I have a Xyron machine, like the one above, that makes this super easy.

Shred them for colorful packing materials or to use in gift bags.

Dress up an old trash can to use in your greenhouse or garden shed.

Roll up the catalog to form a tube, and then use it to store twine or panty hose for tying plants to stakes during the growing season.

If you have a lot of catalogs, use them to line a pond before laying down the rubber lining. This will help prevent punctures in the lining from roots or sharp rocks. Newspaper can be used as well.

Line drawers or shelves with catalog pages in your greenhouse or garden shed to help keep them clean.

Make a paper mosaic. Paint the base object that you want to mosaic black or white (or any color of your choosing).  Then cut or tear the pieces and glue them on the object making sure the base color is showing between pieces. The base color will act as the grout for your project.

Use the plant photos to embellish the outside of a doll house, or if you don't want to glue directly on the doll house, glue the pieces to cardboard to make a landscape scene you can sit behind the doll house.

Cut out the photos and growing instructions and glue them to a piece of card stock paper. Then laminate them and staple to a wooden stack for plant tags in your garden.

Cut one inch strips and weave them into coasters, or make a cool handbag like I found here.


AzureGreen- Celebrating All Paths to the Divine


Great Re-Purposing Ideas

Here are some very cool ideas that were found on Urban Homesteading is a Way of Life Not a Copyright's Facebook page:


***
Chip Bag Clip


***
Hanging planter from an old metal collander


***
An awesome log planter!


***
Love these re-purposing ideas for old rake heads!


***
Here's a neat wire hanger idea


***
Love this little bird feeder!


***
Interesting re-purposing of gutters into gardens


***
Very cool idea for an old sewing machine base and an old sink!


***
Store your seed packets in a small photo album


AzureGreen- Celebrating All Paths to the Divine